This is the Reference documentation for fabric8-auth. You may find it useful if you wish to deploy and configure the service, or to interact with its authentication and authorization services via its REST endpoints. If you wish to understand more about the inner workings of fabric8-auth and be able to build and/or develop the project, please refer to the Developer documentation instead.
Architecture Overview
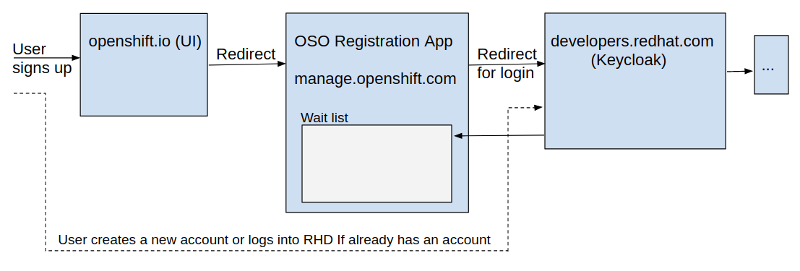
Sign Up
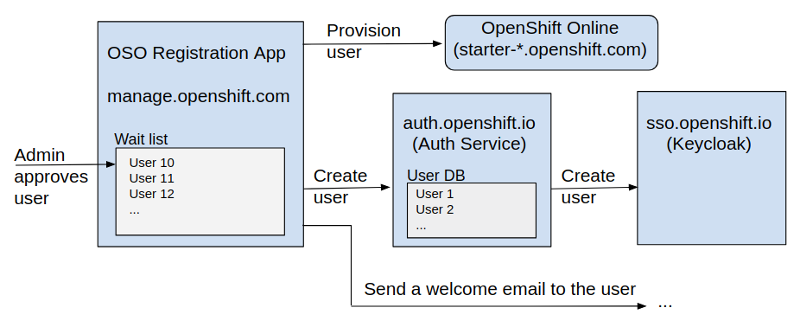
User Approval
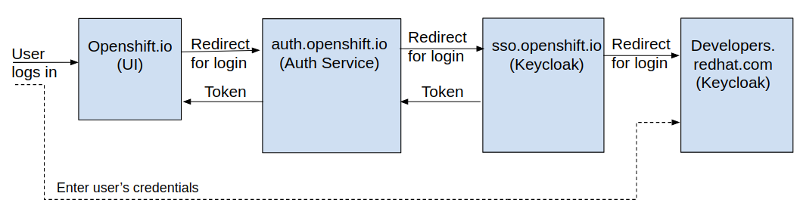
Login
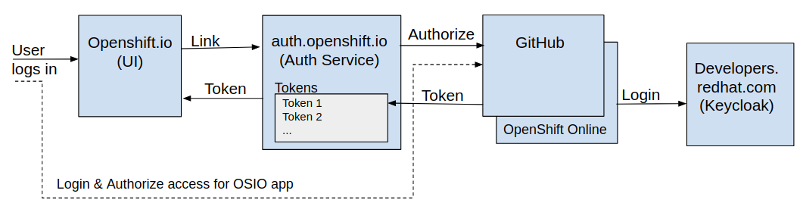
( Login continued ) Linking OpenShift.io account to GitHub and OpenShift Online
Swagger API Documentation
Full API documentation can be found on the Goa Swagger generator site.
Service Accounts
Service accounts are used to authenticate other services to enable them to participate in privileged service-to-service interactions.
Credentials for service accounts are stored in Openshift using secrets, which enable the credentials to be stored outside of the project source code and only made available to fabric8-auth at runtime.
The service account credentials are defined in a JSON document, with each account having the following attributes:
-
name This field is used to describe the account, and has no bearing on the authentication logic
-
id The unique identifier of the service account
-
secrets An array of credential values. Use of an array allows new credentials to be added while retaining older credentials. This strategy allows for a smoother deployment process, eliminating the need to "juggle" the deployment of various services in order to ensure synchronized credentials between systems. Simply add a new credential value, and then only remove expired credentials at a later time once all dependent services have been updated to use the new value.
Adding a service account
When defining secrets for service account credentials, start by creating a JSON document with the account name, id and secrets values:
{
"accounts": [
{
"name":"fabric8-wit",
"id":"5dec5fdb-09e3-4453-b73f-5c828832b28e",
"secrets":["$2a$04$nI7z7Re4pbx.V5vwm14n5.velhB.nbMgxdZ0vSomWVxcct34zbH9e"]
},
{
"name":"fabric8-tenant",
"id":"c211f1bd-17a7-4f8c-9f80-0917d167889d",
"secrets":["$2a$04$ynqM/syKMYowMIn5cyqHuevWnfzIQqtyY4m.61B02qltY5SOyGIOe", "$2a$04$sbC/AfW2c33hv8orGA.1D.LXa/.IY76VWhsfqxCVhrhFkDfL0/XGK"]
},
{
"name":"fabric8-jenkins-idler",
"id":"341c283f-0cd7-48a8-9281-4583aceb3617",
"secrets":["$2a$04$hbGHAVKohpeDgHzafnLwdO4ZzhEn9ukVP/6CaOtf5o3Btp.r6tXTG"]
}
]
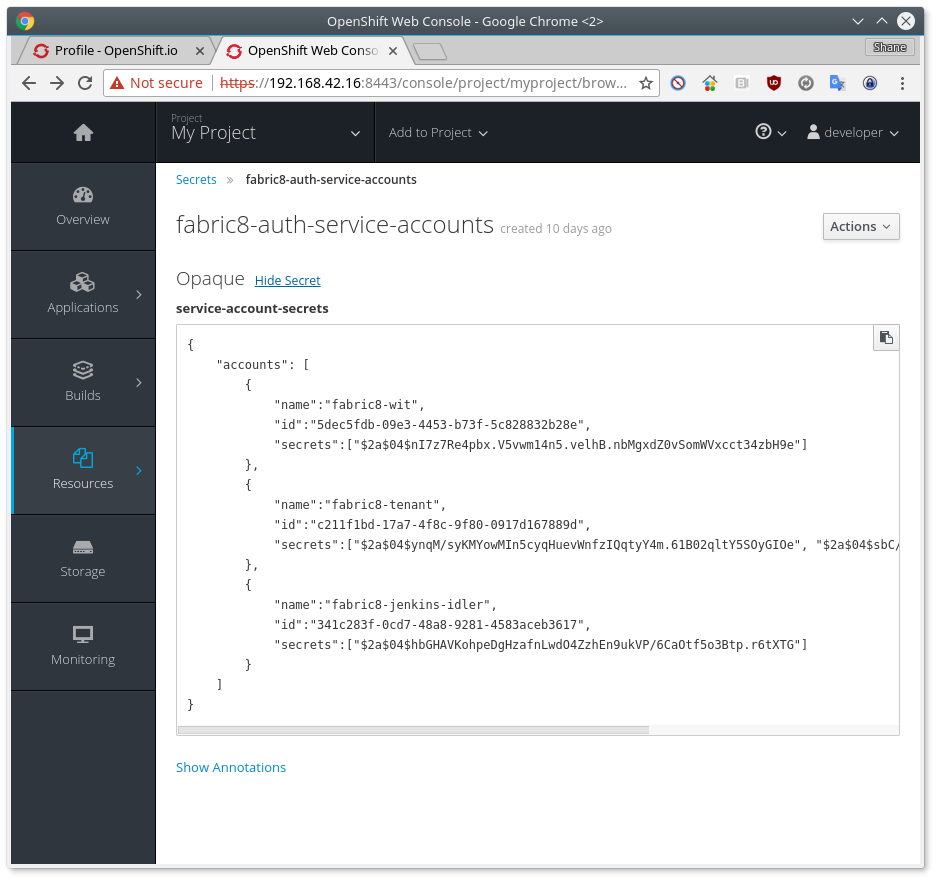
}Next, convert the entire document to a base64 value, this will be used in the secrets configuration:
ew0KICAgICJhY2NvdW50cyI6IFsNCiAgICAgICAgew0KICAgICAgICAgICAgIm5hbWUiOiJmYWJyaWM4LXdpdCIsDQogICAgICAgICAgICAiaWQiOiI1ZGVjNWZkYi0wOWUzLTQ0NTMtYjczZi01YzgyODgzMmIyOGUiLA0KICAgICAgICAgICAgInNlY3JldHMiOlsiJDJhJDA0JG5JN3o3UmU0cGJ4LlY1dndtMTRuNS52ZWxoQi5uYk1neGRaMHZTb21XVnhjY3QzNHpiSDllIl0NCiAgICAgICAgfSwNCiAgICAgICAgew0KICAgICAgICAgICAgIm5hbWUiOiJmYWJyaWM4LXRlbmFudCIsDQogICAgICAgICAgICAiaWQiOiJjMjExZjFiZC0xN2E3LTRmOGMtOWY4MC0wOTE3ZDE2Nzg4OWQiLA0KICAgICAgICAgICAgInNlY3JldHMiOlsiJDJhJDA0JHlucU0vc3lLTVlvd01JbjVjeXFIdWV2V25meklRcXR5WTRtLjYxQjAycWx0WTVTT3lHSU9lIiwgIiQyYSQwNCRzYkMvQWZXMmMzM2h2OG9yR0EuMUQuTFhhLy5JWTc2Vldoc2ZxeENWaHJoRmtEZkwwL1hHSyJdDQogICAgICAgIH0sDQogICAgICAgIHsNCiAgICAgICAgICAgICJuYW1lIjoiZmFicmljOC1qZW5raW5zLWlkbGVyIiwNCiAgICAgICAgICAgICJpZCI6IjM0MWMyODNmLTBjZDctNDhhOC05MjgxLTQ1ODNhY2ViMzYxNyIsDQogICAgICAgICAgICAic2VjcmV0cyI6WyIkMmEkMDQkaGJHSEFWS29ocGVEZ0h6YWZuTHdkTzRaemhFbjl1a1ZQLzZDYU90ZjVvM0J0cC5yNnRYVEciXQ0KICAgICAgICB9DQogICAgXQ0KfQ==This value should then be placed into a JSON document in a new file which will contain the secrets configuration - in this example we use the name fabric8-auth-service-accounts for the secret, which will be used in the next step to reference this secret value. You can call this file anything, but let’s assume it’s called service-account-secrets.json. Also make sure you modify the namespace value to suit your environment:
{
  "apiVersion": "v1",
  "kind": "Secret",
  "metadata": {
    "name": "fabric8-auth-service-accounts"
  },
  "namespace": "developer",
  "data": {
    "service-account-secrets": "ew0KICAgICJhY2NvdW50cyI6IFsNCiAgICAgICAgew0KICAgICAgICAgICAgIm5hbWUiOiJmYWJyaWM4LXdpdCIsDQogICAgICAgICAgICAiaWQiOiI1ZGVjNWZkYi0wOWUzLTQ0NTMtYjczZi01YzgyODgzMmIyOGUiLA0KICAgICAgICAgICAgInNlY3JldHMiOlsiJDJhJDA0JG5JN3o3UmU0cGJ4LlY1dndtMTRuNS52ZWxoQi5uYk1neGRaMHZTb21XVnhjY3QzNHpiSDllIl0NCiAgICAgICAgfSwNCiAgICAgICAgew0KICAgICAgICAgICAgIm5hbWUiOiJmYWJyaWM4LXRlbmFudCIsDQogICAgICAgICAgICAiaWQiOiJjMjExZjFiZC0xN2E3LTRmOGMtOWY4MC0wOTE3ZDE2Nzg4OWQiLA0KICAgICAgICAgICAgInNlY3JldHMiOlsiJDJhJDA0JHlucU0vc3lLTVlvd01JbjVjeXFIdWV2V25meklRcXR5WTRtLjYxQjAycWx0WTVTT3lHSU9lIiwgIiQyYSQwNCRzYkMvQWZXMmMzM2h2OG9yR0EuMUQuTFhhLy5JWTc2Vldoc2ZxeENWaHJoRmtEZkwwL1hHSyJdDQogICAgICAgIH0sDQogICAgICAgIHsNCiAgICAgICAgICAgICJuYW1lIjoiZmFicmljOC1qZW5raW5zLWlkbGVyIiwNCiAgICAgICAgICAgICJpZCI6IjM0MWMyODNmLTBjZDctNDhhOC05MjgxLTQ1ODNhY2ViMzYxNyIsDQogICAgICAgICAgICAic2VjcmV0cyI6WyIkMmEkMDQkaGJHSEFWS29ocGVEZ0h6YWZuTHdkTzRaemhFbjl1a1ZQLzZDYU90ZjVvM0J0cC5yNnRYVEciXQ0KICAgICAgICB9DQogICAgXQ0KfQ=="
    }
}
You can use the OpenShift command line client to create the secret value:
shane@shane-ThinkPad-W541:~$ oc create -f service-account-secrets.json
secret "fabric8-auth-service-accounts" created
After the secret is created, its value must be mounted as a file in the fabric8-auth deployment’s file system so that fabric8-auth can read the service account configuration. This is done in two steps; first we add a volume with the secretName set to the name of our secret. Secondly, we mount that volume in a specific path so that our secret value will be exposed to the fabric8-auth service as a file.
|
Important
|
The secret value must be mounted as /etc/fabric8/service-account-secrets.conf |
Here is an example configuration snippet:
          volumeMounts:
          - mountPath: /etc/fabric8/
            name: auth-serviceaccounts
            readOnly: true
        volumes:
        - name: auth-serviceaccounts
          secret:
            secretName: fabric8-auth-service-accounts
            items:
            - key: service-account-secrets
              path: service-account-secrets.conf
For more information about using secrets as files, refer to the Kubernetes documentation.
Service Account Authentication
To authenticate a service account, use the following endpoint:
POST /api/tokenRequest Parameter |
Description |
grant_type |
Set to |
client_id |
The client ID |
client_secret |
Client credentials |
Request:
POST /api/token
    grant_type=client_credentials&
    client_id=5dec5fdb-09e3-4453-b73f-5c828832b28e&
    client_secret=witsecret
Response:
{"access_token":"eyJhbGciOiJSUzI1NiIsImtpZCI6IjlNTG5WaWFSa2hWajFHVDlrcFdVa3dISXdVRC13WmZVeFItM0Nwa0UtWHMiLCJ0eXAiOiJKV1QifQ.eyJpYXQiOjE1MTA0ODg4NTMsImlzcyI6Imh0dHA6Ly9sb2NhbGhvc3Q6ODA4OSIsImp0aSI6IjAzNmE0OTM2LTEwNTEtNDQxMC05MTI1LTg4YWM1ODE5NDc1NiIsInNjb3BlcyI6WyJ1bWFfcHJvdGVjdGlvbiJdLCJzZXJ2aWNlX2FjY291bnRuYW1lIjoiZmFicmljOC13aXQiLCJzdWIiOiI1ZGVjNWZkYi0wOWUzLTQ0NTMtYjczZi01YzgyODgzMmIyOGUifQ.box9XsE5XR1-OaRdAsKneDabeaOAtqZXcAbFDrwSqYNvwm_zoNEUmG1lDvq7DVVTdRXSvm8dASx0nGOBwrC_Iv2DXlOsO2DxO1lSMDfeQwtFLE9jbwFlqW7xmcjtQLkWqgzGr5gpV-bZo7-lxQuHv4A_hZAiWv03K6hU7qD57KfWuGQm71gV5rqP_Rm3Ay2HDzgmEBiaYoh6XGS5jw4tk-8X6wAJF9phJ73qAQ0E8OcbM9JTPQUQnrbTuaHW-CmtQ4_1TYaBP_j1K__C-o0K14BEGJvyj3geU8CvGjFl7EL94YZmGHidOZtCgRGjNR0KbD6yXUlPMALEhT2R2j65qw","token_type":"Bearer"}OAuth2.0 login
How it works
-
Client sends a generated state. Auth "proxies" it to an identity provider and thereby initiates the first request in oauth2
-
The Identity Provider calls back Auth with a code
-
Auth passes the code to Client ( UI or another services )
-
Client then calls the identity provider to do the code <-> token exchange.
-
Auth works as a smart proxy here between the client and the identity provider.
Steps to login
To get authorization_code
GET /api/authorizeRequest Parameter |
Description |
response_type |
Set to |
client_id |
The client ID |
scope |
scope of permission |
state |
random unique string generate by the person who calls this api to be safe from Cross Site Request Forging |
redirect_uri |
uri where you want to be redirect along with the token |
-
Request
GET /api/authorize
        response_type=code
        client_id=740650a2-9c44-4db5-b067-a3d1b2cd2d01
        scope=user:email
        state=18184535-097d-473e-8dce-0688952d8439
        redirect_uri=https://auth.prod-preview.openshift.io/api/status
required fields: response_type, client_id, state
-
Response:
https://auth.prod-preview.openshift.io/api/status?
    authorization_code=uss.gZs_vR-oBxlzUsYxesh71gBWIZfjYSxSP6xjC8T-WCM.12ca5270-c30f-4c41-90f8-ccbfc5fca498.98447a27-40de-450b-a987-1ddc97730839&
    state=18184535-097d-473e-8dce-0688952d8439
To get access_token
POST /api/tokenRequest Parameter |
Description |
grant_type |
Set to |
client_id |
The client ID |
authorization_code |
authorization_code received as the response of /api/authorize |
redirect_uri |
uri where you want to be redirect along with the token |
-
Request:
POST /api/token
        grant_type=authorization_code
        client_id=740650a2-9c44-4db5-b067-a3d1b2cd2d01
        code=uss.gZs_vR-oBxlzUsYxesh71gBWIZfjYSxSP6xjC8T-WCM.12ca5270-c30f-4c41-90f8-ccbfc5fca498.98447a27-40de-450b-a987-1ddc97730839
        redirect_uri=https://auth.prod-preview.openshift.io/api/status
required fields: all
-
Response:
{
"access_token":"eyJhbGciOiJIUzI1NiIsInR5cCI6IkpXVCJ9.eyJzdWIiOiIxMjM9.FONFh7HgQ",
"token_type":"Bearer",
"refresh_token":"eyJhbGciOiJIUzI1NiIsInR5cCI6IkpXVCJ9.eyJzdWIiOiIxMjM9.FONFh7HgQ",
"expires_in":3600
}
OpenID support
OpenID Configuration endpoint
To get OpenID Configuration of Auth Service, use the following endpoint
-
Request:
GET /api/.well-known/openid-configuration
Sample Response (The fields added so far are REQUIRED and some RECOMMENDED as per OpenID Specs. Overtime new fields will be added to this configuration as per needs of different services)
-
Response:
{
   "authorization_endpoint":"https://auth.openshift.io/api/authorize",
   "claims_supported":[
      "sub",
      "iss",
      "auth_time",
      "name",
      "given_name",
      "family_name",
      "preferred_username",
      "email"
   ],
   "end_session_endpoint":"https://auth.openshift.io/api/logout",
   "grant_types_supported":[
      "authorization_code",
      "refresh_token",
      "client_credentials"
   ],
   "id_token_signing_alg_values_supported":[
      "RS256"
   ],
   "issuer":"https://auth.openshift.io",
   "jwks_uri":"https://auth.openshift.io/api/token/keys",
   "response_types_supported":[
      "code"
   ],
   "scopes_supported":[
      "openid",
      "offline_access"
   ],
   "subject_types_supported":[
      "public"
   ],
   "token_endpoint":"https://auth.openshift.io/api/token",
   "token_endpoint_auth_methods_supported":[
      "client_secret_post",
      "client_secret_jwt"
   ],
   "userinfo_endpoint": "https://auth.openshift.io/api/userinfo"
}
User Information endpoint
OpenID Connect compliant UserInfo endpoint (/api/userinfo) is to be used for retrieving details (claims) about the logged-in user. The list of claims may increase as per the requirements of OpenID Clients ( Different services which are using Auth service).
-
Request:
GET /api/userinfo Accept: application/json Authorization: Bearer $TKN // Token used here is access_token of user token -
Response:
{
  "email": "testuser@redhat.com",
  "family_name": "Test",
  "given_name": "User",
  "preferred_username": "testuser",
  "sub": "c818cb96-211b-8796-8d3f-25c72aada04d"
}
Refresh token endpoint
Use the following endpoint to refresh user token
-
Request:
POST /api/token
        grant_type=refresh_token
        client_id=740650a2-9c44-4db5-b067-a3d1b2cd2d01
        refresh_token=$REFRESH_TOKEN
        scope=openid
required fields: all
-
Response:
{
"access_token":"eyJhbGciOiJIUzI1NiIsInR5cCI6IkpXVCJ9.eyJzdWIiOiIxMjM9.FONFh7HgQ",
"token_type":"Bearer",
"refresh_token":"eyJhbGciOiJIUzI1NiIsInR5cCI6IkpXVCJ9.eyJzdWIiOiIxMjM9.FONFh7HgQ",
"expires_in":3600
}
Offline Tokens
|
Important
|
Support for offline tokens has been removed from the auth service. |
As the offline token feature manifested in a point of vulnerability (where potential attackers may exploit a stolen token across an extensive period of time, without concern for the token expiring), we now recommend that standard access tokens, obtained using the standard OAuth flow are used instead (see above).
Token validation
The JWT contents
The token is likely to contain the following claims.
Header
The header contains the algorithm and the key ID "kid" used to sign the token.
{
  "alg": "RS256",
  "kid": "0lL0vXs9YRVqZMowyw8uNLR_yr0iFaozdQk9rzq2OVU",
  "typ": "JWT"
}
Payload
 "acr": "0",
  "allowed-origins": [
    "https://auth.openshift.io",
    "https://openshift.io"
  ],
  "approved": true,
  "aud": "fabric8-online-platform",
  "auth_time": 1534868165,
  "azp": "fabric8-online-platform",
  "email": "myusername@gmail.com",
  "email_verified": false,
  "exp": 1537460165,
  "family_name": "Bose",
  "given_name": "Shoubhik",
  "iat": 1534868165,
  "iss": "https://sso.openshift.io/auth/realms/fabric8",
  "jti": "4ea61a85-f607-4491-b973-ef6314ae4c23",
  "name": "Shoubhik Bose",
  "preferred_username": "myusername",
  "sub": "3383826c-51e4-401b-9ccd-b898f7e2397d",
  "typ": "Bearer"
}
sub is the identity ID of the user.
jti is the unique token identifier.
Verifying the signature
This is necessary to verify that the JWT was issued by the Auth service and to ensure that the message wasn’t changed along the way. The signature has to be verified against the public key of the corresponding private key used to sign the JWT.
The list of public keys in use is available at https://auth.openshift.io/api/token/keys?format=pem
https://auth.openshift.io/api/token/keys will return keys in JSON Web Key (JWK) format. There are plenty of libraries which can be used to parse JWK keys. Example, https://github.com/dgrijalva/jwt-go .
Using the right public key
Preferrably, choose the public key which has a kid that matches the kid claim in the token header.
Alternatively, you could attempt verifying the signature against all the public keys returned in https://auth.openshift.io/api/token/keys?format=pem . If the verification succeeds for any one of the public keys, Then the token is valid. This, however is less efficient.
The public keys against which the token signature is to be verified
{
  keys: [
    {
      key: "MIIBIjANBgkqhkiG9w0BAQEFAAOCAQ8AMIIBCgKCAQEAjCE4HewT6uAkFk+O01U9jz3nPtQGNTJN9a9DJB3zu0WneUxuwQKYoY3FdgIc7bjwkSEuw8csRUZqoB5fCwdiv10qcoeeAWB07F1E6Etov7YNOrNJcR2rTxhet5IvxWjEBO8fJjexYk5wR2J7VcwOnvAxG0Qt9iymHaAIKoHjrwG0Is+zNtjw6kRq9uqd1r7hddzktaZteaEwSKsl2DHhkjdsY455ZwWlJsjTOtFpL5IK4onmMq2N+4745H8cZlpAo30TrFH5aAV1LyAa/ul2hVdEYtgeBO8dSmYEzu4L5kO5Q9KzsDddqHAXQ2t5ZZh80EgtR36bjCSno5gigB1cpQIDAQAB",
      kid: "0lL0vXs9YRVqZMowyw8uNLR_yr0iFaozdQk9rzq2OVU"
    },
    {
      key: "MIIBIjANBgkqhkiG9w0BAQEFAAOCAQ8AMIIBCgKCAQEAvmvSDzC7VthnlzP2lpTRSTEamcOoS9/O/6uxkTYmOqcCwcID6RBauewLu2YYWvOB8sNb1eqq1r1SQjX7gtxJ4QZ+ME72lbc8ONpJQG/S32cL2P77JSpYhAHdPzefIgKFrtYaxz5LkqQPuHWRfHLKP7RBbFlvwC5j9mIZUe0QV7KolnCV8Z2G5cUCVzu79PxQNWvm0z8Tq3xcB46TRRiCIA+skeFc98k5H2kYbwEwCdSdeRF0Bzmc4pUNkkHvmtWD0M6uoGo+m+ajM9gP38ZO1z2ILLeHSCQb2FpXMX+GuSH+1dWESD3Y53J8p1rrcjhSvxxNoj5hPLWX2HeYf301QwIDAQAB",
      kid: "quzUZlR_ollAUoAGgm165tYDTU3xtKon8O1RghJZ4TU"
    }
  ]
}
The header of the token which contains the kid
{
  "alg": "RS256",
  "kid": "0lL0vXs9YRVqZMowyw8uNLR_yr0iFaozdQk9rzq2OVU",
  "typ": "JWT"
}
Expiry
Ensure the token hasn’t expired by 'inspecting' the JWT and verifying the exp: 1537460165 claim.
The "exp" (expiration time) claim identifies the expiration time on or after which the token MUST NOT be accepted for processing. The processing of the "exp" claim requires that the current date/time MUST be before the expiration date/time listed in the "exp" claim.Usage
Golang
-
Import
github.com/fabric8-services/fabric8-auth/token/jwkto make use ofFetchKeys(endpointURL)from https://github.com/fabric8-services/fabric8-auth/blob/master/token/jwk/fetch_keys.go to get the currently in-use public keys. -
Use the
ParseToken(..)function ofgithub.com/fabric8-services/fabric8-common/tokenfrom https://github.com/fabric8-services/fabric8-common/blob/master/token/token.go#L133 to validate & parse the token.
Authorization support
To validate what a user can do in a space or an arbitrary resource, the resource server or the client needs to determine
the actions ( scopes ) the the user is permitted to undertake.
Determining the scope using RPT tokens
The Auth service wraps the permission information in the user’s token. Such user’s tokens which also have permission information are known as RPT tokens.
The content of the permissions claim in the user’s token indicates if the user has the required scope for a specific resource.
permissions: [
    {
      resource_set_name: null,
      resource_set_id: "c0ee2b94-aee3-4c41-9e15-6fa330ce8e0b",
      scopes: [
        "view","contribute","manage"
      ],
      exp: 1535500572
    },
    {
      resource_set_name: null,
      resource_set_id: "d0ee5b94-aee3-4c41-9e15-6fa330ce8e0e",
      scopes: [
        "view","contribute"
      ],
      exp: 1535500572
    }
  ],
However, it is possible that the content of the token would be stale because of changes in permission associations since the time the token was issued. To accurately determine the permission scope a user has, for a resource, here’s what the resource server should be doing, before making an authorization decision.
-
Call the Audit token API
-
If no token is returned, it implies that the existing token has the latest permission information.
-
If the call to the Audit API returns a token, the resource server should introspect the
permissionsclaim in the new token. the resource server should return the updated token to the client/UI in theAuthorization: Bearer UPDATED_RPT_TOKENresponse header so that the UI can start using it in subsequent requests.
POST /api/token/auditRequest Parameter |
Description |
resource_id |
The ID of the resource associated with the business entity. For spaces, use the space ID. |
Request:
POST /api/token/audit?resource_id=c0ee2b94-aee3-4c41-9e15-6fa330ce8e0b
Authorization: Bearer eyJh___token___8HlA
Response:
The response body would be empty with a status of 200 OK if a newer token is not needed. If the authorization service deems it necessary to return an RPT token with more recent information, the response would be as follows.
{
  rpt_token: eyJh___token___OeibQ
}
Decoded RPT token:
{
  acr: "0",
  allowed-origins: [
    "http://auth.openshift.io",
    "http://openshift.io"
  ],
  approved: true,
  aud: "http://openshift.io",
  auth_time: 1535414160,
  azp: "http://openshift.io",
  email: "TestUser-50edff18-6c86-4910-b069-37d68f1c02c1@test.com",
  exp: 1538006160,
  family_name: "",
  given_name: "TestUser-50edff18-6c86-4910-b069-37d68f1c02c1",
  iat: 1535414160,
  iss: "http://auth.openshift.io",
  jti: "109d09ed-91cc-4393-8fa1-bc3187aa40ba",
  name: "TestUser-50edff18-6c86-4910-b069-37d68f1c02c1",
  nbf: 0,
  permissions: [
    {
      resource_set_name: null,
      resource_set_id: "c0ee2b94-aee3-4c41-9e15-6fa330ce8e0b",
      scopes: [
        "view","contribute","manage"
      ],
      exp: 1535500572
    },
    {
      resource_set_name: null,
      resource_set_id: "d0ee5b94-aee3-4c41-9e15-6fa330ce8e0e",
      scopes: [
        "view","contribute"
      ],
      exp: 1535500572
    }
  ],
  preferred_username: "TestUserIdentity-50edff18-6c86-4910-b069-37d68f1c02c1",
  session_state: "eaca58df-b6e1-4a58-8d3a-600dfdfdfdf40",
  sub: "7aca58df-b6e1-4a58-8d3a-600df382dd40",
  typ: "Bearer"
}
Pre-configured Authorization Scopes
Business Resource Entity |
Scopes |
system |
|
space |
|
Configuration
This section describes the configuration options available for the fabric8-auth service.
Property |
Default |
Description |
privilege.cache.expiry.seconds |
86400 |
The number of seconds after a privilege cache entry is created that it will expire |
rpt.token.max.permissions |
10 |
The maximum number of permissions that may be stored in an RPT Token |